 Pin it
 Last spring, I opened a bag of freeze-dried strawberries and the smell hit me like summer concentrated into dust. I was supposed to make trail mix, but instead I dumped half the bag into melted white chocolate just to see what would happen. What came out of the fridge that afternoon was the brightest, fruitiest fudge I'd ever tasted, and I've been making these pink squares ever since. They're sweet, tangy, and impossibly easy to pull off when you need something that looks fancy but doesn't require an oven.
I brought a batch to a potluck once and watched three people assume they were store-bought until someone asked where I got them. The truth, that I made them in my pajamas that morning, felt almost like cheating. One friend took a square, closed her eyes, and said it tasted like a strawberry milkshake turned solid. I've been chasing that compliment ever since.
Ingredients
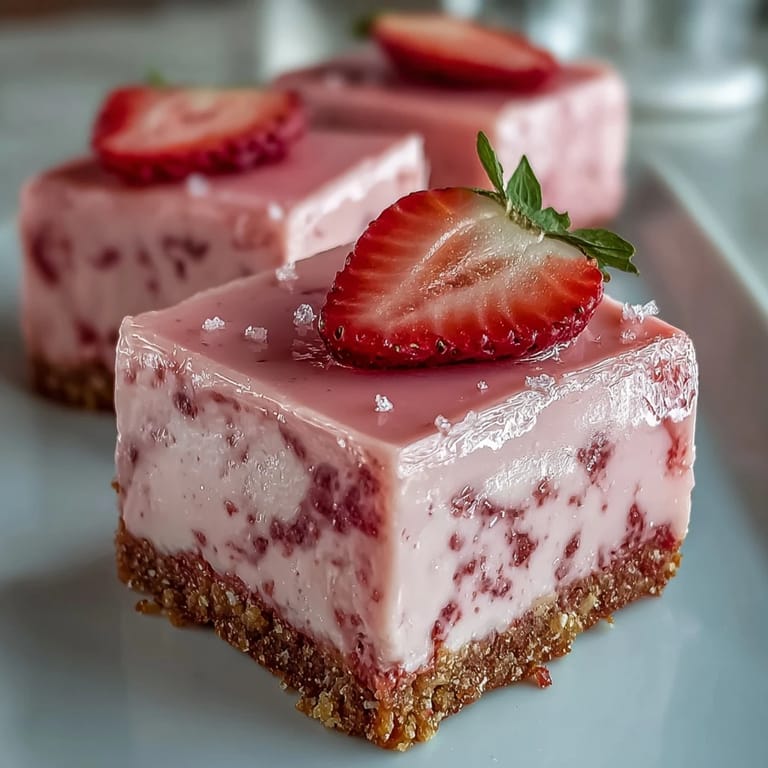
- Digestive biscuits or graham crackers: These form the crunchy base that holds everything together, and crushing them by hand in a bag is oddly therapeutic after a long day.
- Unsalted butter: Melted butter binds the crumbs into a press-in crust that won't crumble when you slice, and using unsalted lets you control the sweetness.
- White chocolate chips: The creamy backbone of the fudge layer, white chocolate melts smooth and plays nicely with the strawberry without fighting for attention.
- Sweetened condensed milk: This is what makes the fudge set firm and silky, turning melted chocolate into something sliceable and rich.
- Freeze-dried strawberries: Ground into powder, they deliver pure berry flavor and natural pink color without adding moisture that would ruin the texture.
- Pure vanilla extract: Just a teaspoon rounds out the sweetness and keeps the white chocolate from tasting flat or one-note.
- Pinch of salt: A tiny bit of salt wakes up the strawberry and keeps the fudge from crossing into tooth-achingly sweet territory.
- Pink or red gel food coloring: Totally optional, but a drop or two makes the squares look like they belong on a dessert table at a garden party.
- Fresh strawberry slices: A quick garnish that hints at what's inside and makes each square feel a little more special when you serve them.
Tired of Takeout? 🥡
Get 10 meals you can make faster than delivery arrives. Seriously.
One email. No spam. Unsubscribe anytime.
Instructions
- Prep the pan:
- Line your square pan with parchment, leaving a couple of inches hanging over two sides like little handles. This trick turns out to be a lifesaver when it's time to lift the whole slab out for slicing.
- Build the crust:
- Mix your crushed biscuits with melted butter until every crumb is coated and the mixture clumps when you squeeze it. Press it into the pan in an even layer, using the bottom of a glass to really pack it down, then pop it in the fridge while you make the fudge.
- Melt the base:
- Set a heatproof bowl over a pan of simmering water and add the white chocolate and condensed milk. Stir gently and steadily until everything melts into a glossy, smooth pool that coats the back of your spoon.
- Flavor it:
- Pull the bowl off the heat and stir in your strawberry powder, vanilla, salt, and food coloring if you're using it. The mixture will turn a soft pink and smell like a strawberry patch in July.
- Assemble:
- Pour the fudge mixture over your chilled crust and spread it to the edges with a spatula. Don't worry if it's not perfectly smooth, it'll settle as it chills.
- Set it:
- Cover loosely with plastic wrap and refrigerate for at least two to three hours, or until the top feels firm and doesn't leave a fingerprint when you press it lightly. Patience here is everything.
- Slice and serve:
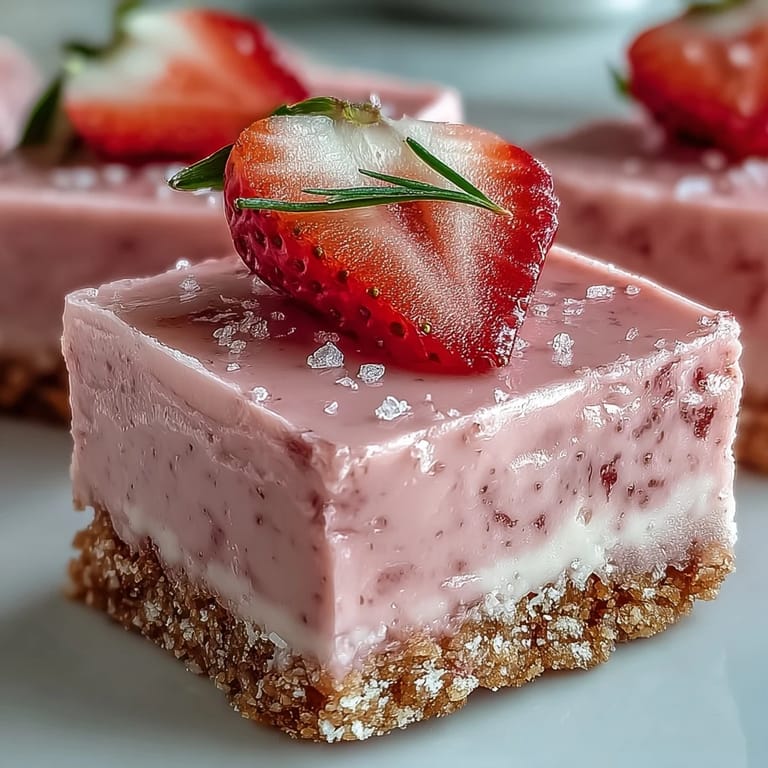
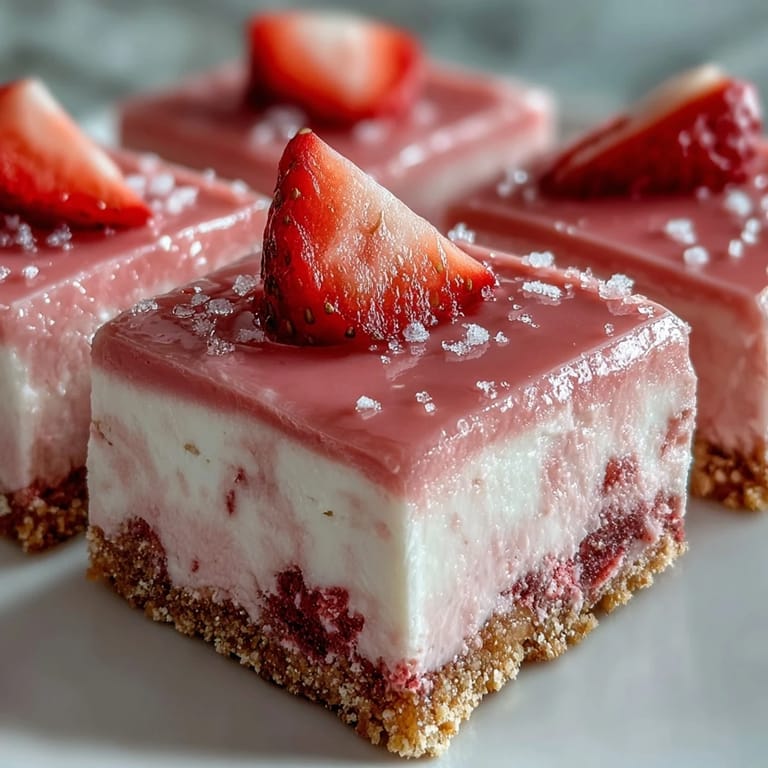
- Lift the whole thing out using the parchment, set it on a cutting board, and slice into sixteen squares with a sharp knife. Wipe the blade between cuts for clean edges, and garnish with fresh strawberry slices or extra freeze-dried bits if you want them to look extra pretty.
 Pin it
 The first time I served these at a birthday party, a kid asked if they were made of real strawberries or magic. I said both, and she nodded like that made perfect sense. Watching her take tiny bites to make it last longer reminded me why I love recipes that feel like a little celebration, even on a regular Wednesday.
Storing and Make-Ahead Tips
These squares keep beautifully in an airtight container in the fridge for up to five days, stacked between sheets of parchment to keep them from sticking. I've made them two days ahead for parties and they actually taste better after a full night of chilling, when the flavors have had time to settle and deepen. If you want to freeze them, wrap each square individually in plastic wrap and tuck them into a freezer bag for up to a month, then thaw in the fridge before serving.
Flavor Variations to Try
Once you've made the basic version, it's hard not to start experimenting. I've swirled in crushed freeze-dried raspberries for a marbled berry effect, swapped the strawberry powder for lemon zest and a splash of lemon juice for a citrusy twist, and even stirred in a handful of white chocolate chips for extra texture. A friend of mine adds a tablespoon of cream cheese to the fudge mixture for a cheesecake vibe, and it works surprisingly well.
Serving Suggestions
I like to let these sit at room temperature for about ten minutes before serving so the fudge softens just enough to melt on your tongue. They're perfect alongside coffee or iced tea, stacked on a dessert platter with fresh berries, or packed into a tin as a homemade gift that actually looks like you tried.
- Serve them on a white plate with a dusting of powdered sugar and a few mint leaves for a simple, elegant look.
- Pair them with vanilla ice cream or whipped cream for an easy no-bake strawberry shortcake vibe.
- Wrap individual squares in wax paper and tie with twine for party favors or lunchbox treats that won't get squashed.
 Pin it
 These strawberry fudge squares have become my go-to when I want to impress without the pressure of perfection. They're forgiving, colorful, and always gone before I remember to save one for myself.
Recipe FAQs
- → How long do these squares need to chill?
Refrigerate for at least 2-3 hours until the fudge layer feels firm to the touch. For best results, chill overnight to ensure clean cutting.
- → Can I use fresh strawberries instead of freeze-dried?
Yes, purée 100g fresh strawberries and strain to remove seeds. The texture will be slightly softer and the color more subtle than with concentrated freeze-dried powder.
- → How should I store these fudge squares?
Keep in an airtight container in the refrigerator for up to 5 days. The cold storage maintains the fudgy texture and prevents the graham crust from becoming soggy.
- → Can I make these dairy-free?
Substitute dairy-free white chocolate chips and coconut condensed milk. Use dairy-free butter or coconut oil for the crust. The setting time may vary slightly.
- → Why use a double boiler for melting?
Gentle heat from simmering water prevents the white chocolate from scorching or seizing. This method ensures a smooth, glossy fudge without grainy textures.